
Have you lately sanded the hardwood flooring in your home and become concerned about the need to screen it? Preparing the floor for the installation of wood finishes is indeed a delicate process.
Don't worry, we will go through everything in detail here so you can finish screening hardwood floors like an expert. Let's get the work done, shall we?
Introduction to the Importance of Screening Hardwood Floors
The importance of screening hardwood floors or any type of wood floor to maintain their beauty, durability, and longevity cannot be overstated.
Screening is the process of lightly sanding the floor surface to remove defects and prepare it for refinishing or recoating. This task restores the original sheen and smoothness of the hardwood flooring improving its overall aesthetic appeal. Furthermore, screening hardwood reduces surface scratches, scuffs, and minor damage caused by foot traffic or furniture movement.
You may prevent deep-seated stains from developing and guard against further wear and tear by screening hardwood flooring every few years or as needed.
This not only saves you money on costly replacements, but it also increases the value of your house by retaining its original aesthetic charm.
An Explanation of What Screening Hardwood Floors Entails
Hardwood floor screening is an important aspect of upkeep and restoration because it helps the floorboards last longer and age better. Scratches and the thin layer of existing finish on the floor’s surface can be removed using a specialized screening machine. This gets it ready for a new coat of any type of finish or topcoat to be applied.
Screening equipment requires meticulous dusting and cleaning to ensure accurate readings and a professional floor look.
To smooth away imperfections like stains or dents in the floor when screening, you may need to use rough screens or sandpaper. After screening, it may be necessary to apply a fresh coat of finish, such as a coat of polyurethane or sealer after lightly sanding the area by hand.
Benefits of Screening Hardwood Floors for Maintenance and Longevity
Screening a hardwood floor removes the top layer of finish. This process removes natural scratches, scuffs, and flaws. Thus, in less than 24 hours, the floor's natural beauty is restored. This method also permits the application of a new coat of polyurethane (water-based polyurethane or oil-based polyurethane) or another protective sealer. This barrier prevents wood floor damage and decay. Screening also eliminates color changes caused by sunlight or aging ensuring consistency across the floor.
This maintenance method lowers the need for considerable floor sanding, which is less efficient and more disruptive to daily rhythms. Screening hardwood floors instead of refinishing them can extend their lifespan at a fraction of the expense. To achieve consistently good outcomes, this maintenance should be done every 2-3 years.
A Step-by-Step Guide on How to Screen Hardwood Floors Properly
The process of screening wooden floors is crucial for preserving their aesthetic appeal and extending their durability. We will try to simplify it for you with the following steps:
1. Purchase the essential equipment, including a floor buffer, screens with suitable grit levels, a vacuum cleaner, and dust masks for personal protection.
2. Ensure that the floor is in a clean state. This can be achieved by diligently vacuuming or sweeping the area to eliminate any loose dirt or debris.
3. Continue by affixing the suitable grit screen to the buffer and starting the task of working on a designated portion of the floor with consistent and fluid strokes.
To avoid marking the wooden surface, the machine must move continuously. After screening one portion, screen the rest of the floor. Vacuum all residue to remove it.
Carefully check the area for missed patches or unevenness. Floor finish should only be applied following these stages. Effective screening with focused attention to detail can return your hardwood floor to its former state.
The Necessary Tools and Materials needed for Wooden Floor Screening
During the process of screening hardwood floors, it is essential to possess a range of necessary tools and materials, such as a floor buffer or sander, that are capable of efficiently screening the wood surface.
This tool plays a vital role in the removal of old finishes and the preparation of the floor for recoating. In addition, it is advisable to have a diverse selection of grits available, ranging from coarse to fine, in order to accommodate the specific condition of the floor and attain the desired level of smoothness.
When it comes to ensuring safety during sanding, it is imperative to utilize protective equipment such as goggles and a dust mask. These items are crucial, as they effectively shield against particles and potential injuries caused by flying debris.
Finally, it is necessary to have a high-quality polyurethane coating or other suitable finishing materials for the floor readily available in order to successfully complete the screen and recoat process.
Tips for Preparing the Room Before Screening Hardwood Floors
When it comes to preparing the room before screening hardwood floors, you need to stick to several guidelines to guarantee a flawless outcome.
In order to ensure a smooth process and prevent any potential damage, it is essential to remove all furniture, rugs, and other items from the room.
Next, it is recommended to comprehensively sweep or vacuum the floor to effectively remove any accumulated dust and debris. This step is necessary to achieve a polished surface on wood floors for screening and protects the wood from any potential abrasive particle damage. It is important to also check for any protruding nails or loose boards that require repair before screening. In addition, it is advised to utilize plastic sheets or drop cloths to cover windows and doorways.
Finally, as a precautionary step, it is advisable to conduct thorough testing of the equipment and make any necessary adjustments before starting the operation.
This preparation phase will help save valuable time and resources. By adhering to these guidelines, you can ensure that your hardwood floor is meticulously prepared for screening, setting you up for a superior finish for your refinishing project.
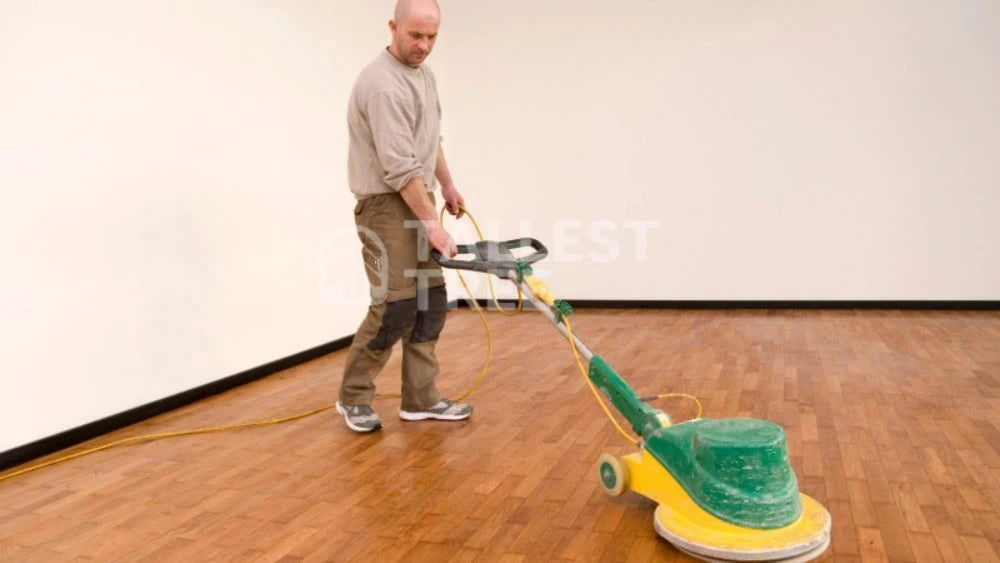
Techniques for Sanding and Buffing Hardwood Floors during Screening
In the screening procedure, fine-grit sandpaper or mesh screen is used to gently abrade the floor's surface.
This method removes scratches and tiny dents, giving a smooth surface for subsequent processes. In order to achieve floor homogeneity, this step requires steady pressure and long linear strokes.
After screening, hardwood floors must be buffed to restore their gloss and appearance.
Industrial-grade buffing machines have soft pads or bonnets for hardwood surfaces. To uniformly distribute polishing compounds and get a glossy finish, the machine is moved smoothly across the floor. Between the sanding and buffing steps, dust must be vacuumed. By following these steps, you can turn your hardwood floor into a work of art with lasting beauty and elegance.
Common Mistakes to Avoid when Screening Hardwood Floors
One of the most common mistakes is failing to adequately prepare the floors before initiating the screening process. Insufficiently conducting a comprehensive sweep of the floor will result in an unsatisfactory outcome, as dirt and debris have the potential to become embedded within the recently applied sealant or finish.
Another significant error is using an unsuitable grit sequence during the sanding process.
It is also important to avoid rushing through the screening process and ensure that sufficient drying time is allowed between coats. Failure to do so can result in uneven curing and premature wear of the finish.
Professionals can ensure successful outcomes when screening wooden floors by avoiding these common mistakes and adhering to proper procedure.
How Often Should Hardwood Floors Be Screened for Optimal Results?
Screening hardwood floors once every three to five years is recommended to get the best results and to keep them looking beautiful for as long as possible. Scratches, scuffs, and dullness can appear on a floor over time due to things like foot traffic and the movement of furniture. A screen or mesh disk attached to a buffer machine is used to softly sand the floor's top layer. The finish is not damaged in any way but rather simply abraded to get rid of superficial scratches. If you decide to refinish the floor, screening is the first step. You can easily revitalize your hardwood floors by adhering to this periodic maintenance program rather than turning to more extensive restoration methods like totally sanding down the surface. Hardwood floors are an expensive investment, but regular inspections can help keep them looking like new for much longer.
Final Thoughts on the Benefits and Value of Screening Hardwood Floors
In conclusion, there is no denying the value and benefits that come from hardwood floor screening. To begin with, this technique efficiently revives weathered wood floors without the need for a full restoration.
Screening restores the floor's cleanliness by gently abrading the surface to get rid of visible flaws, including scratches, scuffs, and light stains.
This method also helps hardwood floors last longer since it protects them from harm and wear.
Overall, screening is a relatively cheap and quick fix that improves the look and life expectancy of hardwood floors without breaking the bank. We hope that this blog will help you achieve whatever you envision for your hardwood floors.